Homemade Tamagotchi
Concept
To create a tamagotchi-like game system with minimal hardware components in a custom form factor.

Hardware
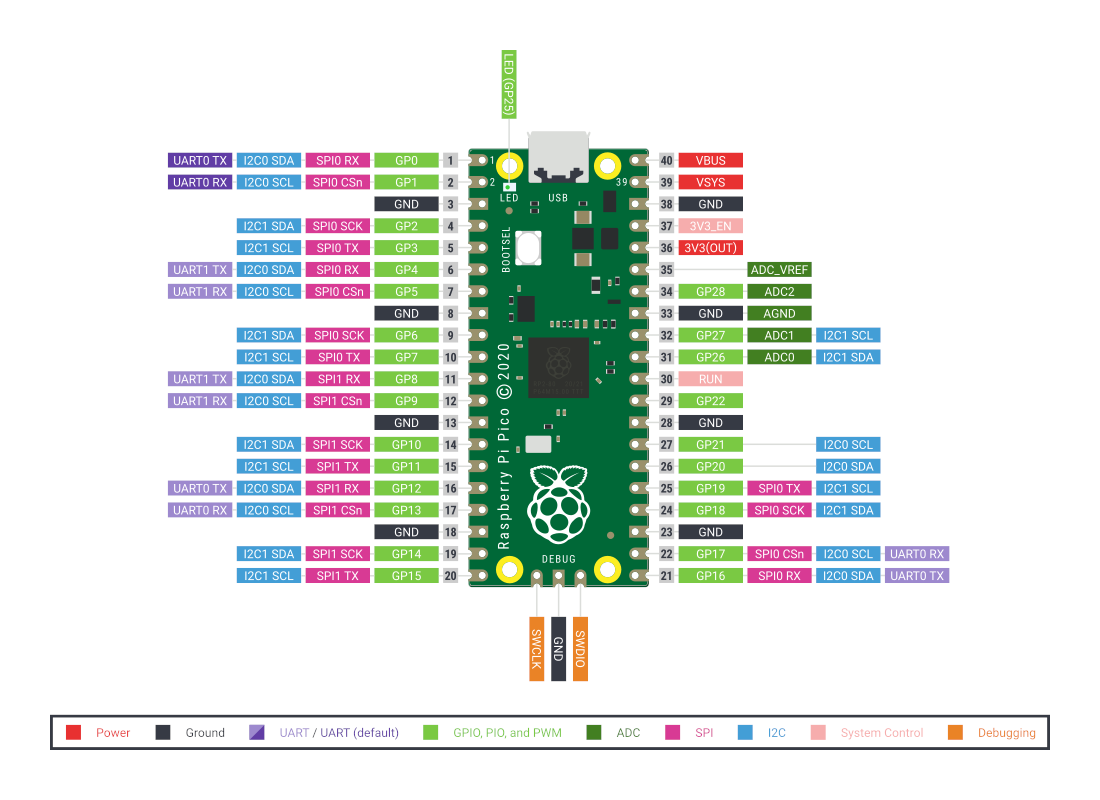
Rasberry Pi Pico
Proposed solution to use a Rasberry Pi Pico as main hardware. With Pimoroni modules and parts like display and buttons to supplement.
Modules used/ wishlist
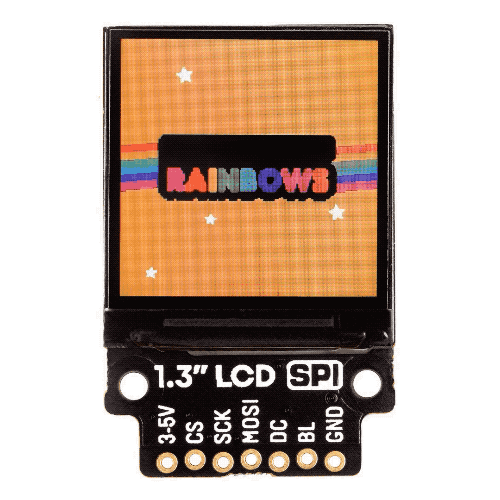
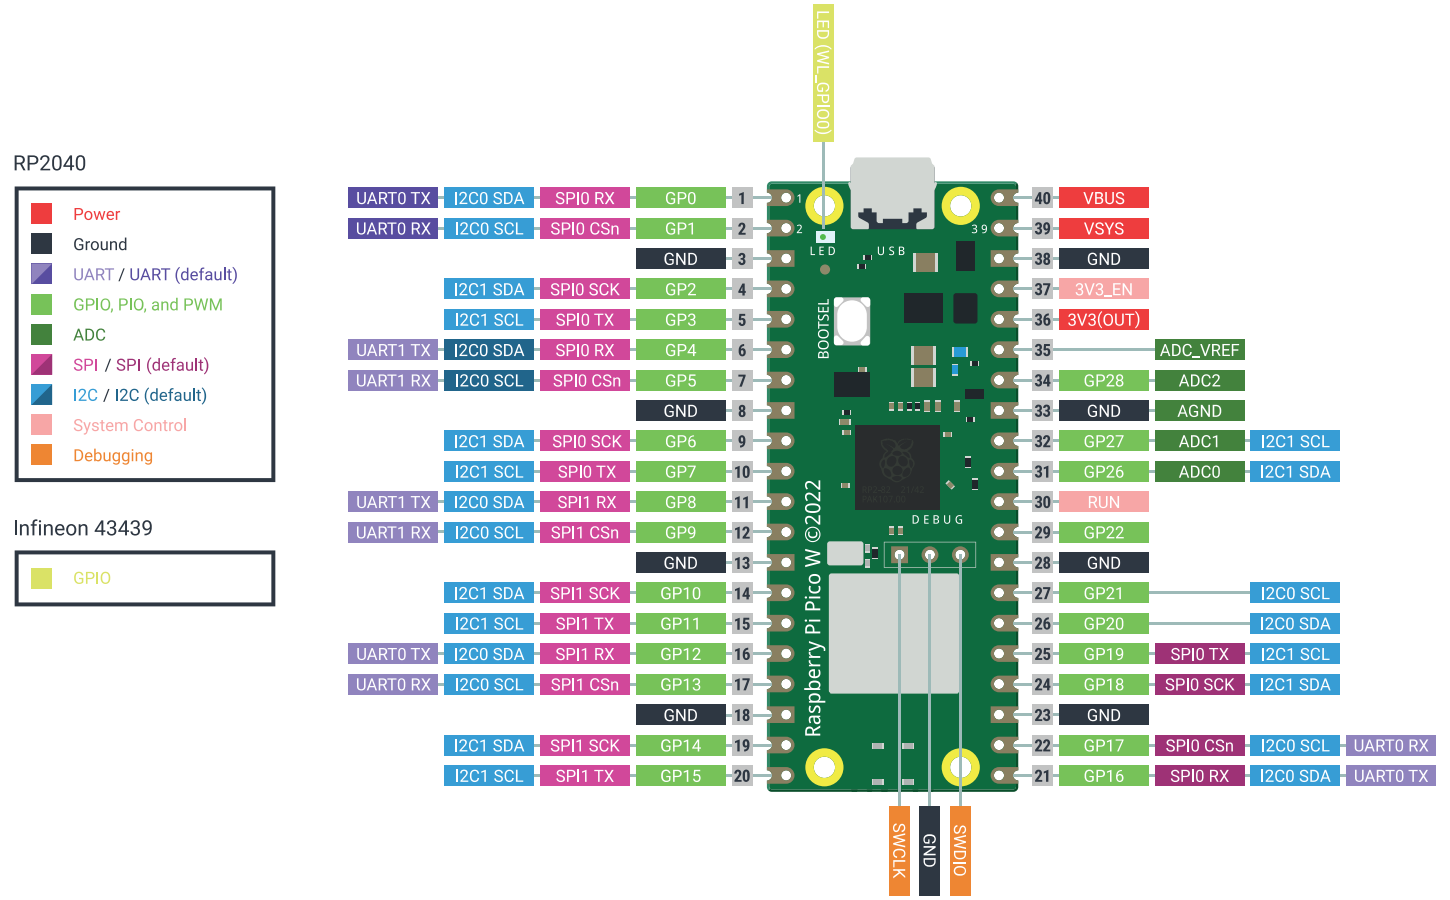
- Raspberry Pi Pico W – Pico W -
RP2040microcontroller - 1.3" SPI Colour Square LCD (240x240) Breakout
- Adafruit QSPI DIP Breakout Board -
W25Q128- 128 MBit 16 MByte -W25Q128JVSSIQ -
RV3028Real-Time Clock (RTC) Breakout - Blinkt! - Eight super-bright RGB LED indicators
![]()
Existing frameworks
Pimoroni PicoSystem
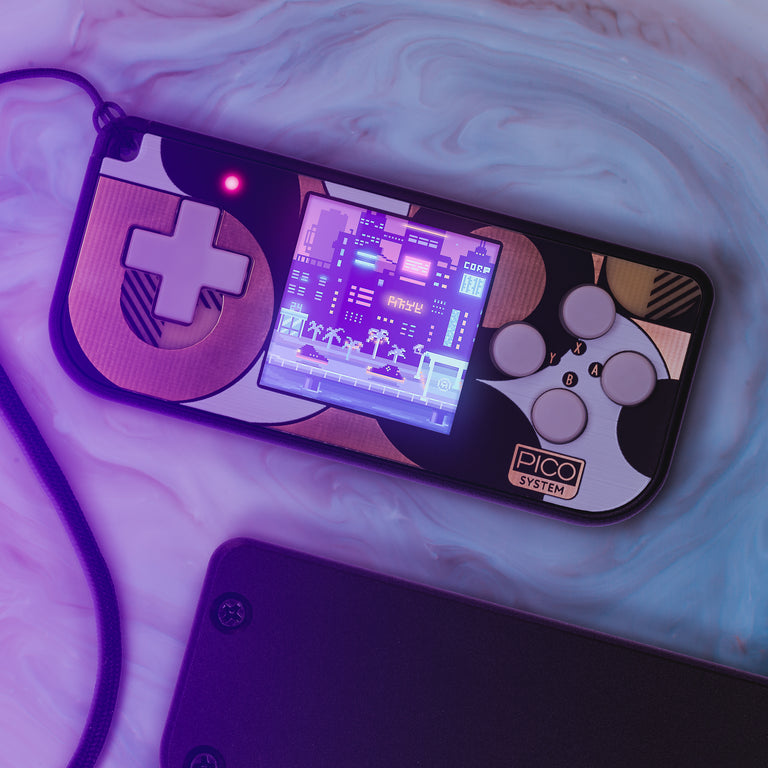
PIM559 - pimoroni.com entry
Features
- Powered by RP2040 (Dual Arm Cortex M0+ running at up to 133Mhz with 264kB of SRAM)
- 16MB of QSPI flash supporting XiP
- 1.54" colour SPI IPS LCD (240 x 240 pixels)
- D-pad and buttons
- 525mAh LiPo battery (should be good for at least 6 hours of on-time)
- Piezo buzzer/speaker
- On/off power button
- RGB LED
- CNC milled aluminium case
- Wrist strap
- Programmable and rechargeable via USB-C (cable not included)
- Comes fully assembled.
- C++/MicroPython API
- Schematic
Dev Environment
IDE
Compiler
Libraries
Software
Hello World - Blink
Blink, the Hello World of rasberry pi, making the LED blink.

Code difference based on hardware
Copyright (c) 2022 Raspberry Pi (Trading) Ltd.
| picow_blink.c | |
|---|---|
Pimoroni Pico display
![]()
Demo

#include <math.h>
#include <vector>

#include "drivers/st7789/st7789.hpp"
#include "libraries/pico_graphics/pico_graphics.hpp"

using namespace pimoroni;

const int WIDTH = 240;
const int HEIGHT = 240;

ST7789 st7789(WIDTH, HEIGHT, ROTATE_0, false, get_spi_pins(BG_SPI_FRONT));
PicoGraphics_PenRGB332 graphics(st7789.width, st7789.height, nullptr);

int main() {
  st7789.set_backlight(255);

  struct pt {
    float      x;
    float      y;
    uint8_t    r;
    float     dx;
    float     dy;
    Pen      pen;
  };

  std::vector<pt> shapes;
  for(int i = 0; i < 100; i++) {
    pt shape;
    shape.r = (rand() % 10) + 3;
    shape.x = rand() % (graphics.bounds.w - (shape.r * 2));
    shape.y = rand() % (graphics.bounds.h - (shape.r * 2));
    shape.x += shape.r;
    shape.y += shape.r;
    shape.dx = float(rand() % 255) / 64.0f;
    shape.dy = float(rand() % 255) / 64.0f;
    shape.pen = graphics.create_pen(rand() % 255, rand() % 255, rand() % 255);
    shapes.push_back(shape);
  }

  Pen BG = graphics.create_pen(120, 40, 60);
  Pen WHITE = graphics.create_pen(255, 255, 255);

  while(true) {
    graphics.set_pen(BG);
    graphics.clear();

    for(auto &shape : shapes) {
      shape.x += shape.dx;
      shape.y += shape.dy;
      if(shape.x < shape.r) shape.dx *= -1;
      if(shape.x >= graphics.bounds.w - shape.r) shape.dx *= -1;
      if(shape.y < shape.r) shape.dy *= -1;
      if(shape.y >= graphics.bounds.h - shape.r) shape.dy *= -1;

      graphics.set_pen(shape.pen);
      graphics.circle(Point(shape.x, shape.y), shape.r);
    }

    graphics.set_pen(WHITE);
    graphics.text("Hello World", Point(0, 0), 240);

    // update screen
    st7789.update(&graphics);
  }

    return 0;
}
Pimoroni PicoSystem
Game Engine Library
init()Called once when your program starts to allow you to perform any setup that's required like generating map data or initialising the player state.
update(tick)Called at the start of every frame to allow you to update the game state; for example, processing user input, triggering sound effects, or doing collision detection.
draw(tick)Called after update() to allow you to draw the new view of the game world. You should only perform drawing operations in this method.
Demo
![]()
#include <math.h>
#include <algorithm>
#include <array>

#include "picosystem.hpp"

using namespace picosystem;

// a place to define and store our weapons
struct weapon_t {
  int id;
  std::string name;
};

std::array<weapon_t, 9> weapons = {{
  {TRIDENT, "Trident"},
  {SWORD_IRON, "Sword"},
  {SHOTGUN_AUTO, "Laser Gun"},
  {MORNING_STAR, "Mace"},
  {SAIS, "Dagger"},
  {SPEAR, "Spear"},
  {BOW_HUNTERS, "Bow"},
  {PISTOL, "Pistol"},
  {SHOTGUN, "Shotgun"}
}};

float target_angle = 0.0f;
int selected = 0;
voice_t blip;

// initialise the world


// process user input and update the world state
void update(uint32_t tick) {
  // if LEFT or RIGHT pressed then switch the selected weapon and calculate
  // the selected weapons angle on screen to animate towards.
  if(pressed(LEFT)) {
    selected = selected == 0 ? weapons.size() - 1 : selected - 1;
    target_angle += 360.0f / weapons.size();
    play(blip, 1800, 30, 100);
  }
  if(pressed(RIGHT)) {
    selected = selected == weapons.size() - 1 ? 0 : selected + 1;
    target_angle -= 360.0f / weapons.size();
    play(blip, 1800, 30, 100);
  }
}

// convert degrees to radians
float deg_to_rad(float d) {
  return d * (3.1415927 / 180.0f);
}

// draw the world
void draw(uint32_t tick) {
  // clear the background
  alpha();
  pen(1, 1, 1);
  clear();

  pen(10, 10, 10);
  text("Choose your weapon:", 8, 10);

  // animate towards the selected weapons angle
  static float angle = 0.0f;
  angle += (target_angle - angle) / 10.0f;

  // create a sorted list of weapon ids based on how far "back" they are
  // on the screen. this means we can draw weapons at the back first and the
  // ones at the front will correctly overlay them
  std::array<uint32_t, 9> weapon_ids = {0, 1, 2, 3, 4, 5, 6, 7, 8};

  std::sort(
    weapon_ids.begin(), weapon_ids.end(),
    [](int i1, int i2) {
      float ia1 = (i1 * (360.0f / weapons.size())) + angle;
      float ia2 = (i2 * (360.0f / weapons.size())) + angle;
      return cos(deg_to_rad(ia1)) < cos(deg_to_rad(ia2));
  });

  for(auto i : weapon_ids) {
    // work out angle of each weapon (9 in total) and add to current rotation
    // angle
    float item_angle = (i * (360.0f / weapons.size())) + angle;

    // add a bounce to the selected weapon
    int32_t bounce = 0;
    if(i == selected) {
      bounce = sin(deg_to_rad(item_angle + (time() / 2.0f))) * 10.0f - 10.0f;
    }

    // position of weapon icon on screen
    int32_t x = sin(deg_to_rad(item_angle)) * 45.0f;
    int32_t y = cos(deg_to_rad(item_angle)) * 20.0f;

    // size to draw weapon (closer = larger)
    int32_t scale = ((cos(deg_to_rad(item_angle)) + 1.0f) * 8.0f) + 8.0f;

    // draw the shadow
    blend(PEN);
    int32_t sw = scale + (bounce / 2);
    int32_t sh = sw / 4;
    pen(0, 0, 0);
    sprite(
      weapons[i].id,                                        // sprite id
      60 + x - (sw / 2), 50 + y + (scale / 1.2),  // position
      1, 1,
      sw, sh                                        // size
    );

    blend(ALPHA);

    // draw the weapon sprite
    int32_t a = ((cos(deg_to_rad(item_angle)) + 1.0f) * 6.0f) + 4.0f;
    a = a > 15 ? 15 : a;
    alpha(a);
    sprite(
      weapons[i].id,                                        // sprite id
      60 + x - (scale / 2), 55 + y - (scale / 2) + bounce,  // position
      1, 1,
      scale, scale                                          // size
    );
    alpha(15);

    //pen(15, 15, 15);
    //text(str(a), 60 + x - (scale / 2), 55 + y - (scale / 2) + bounce);
  }


  // centre name of weapon at bottom of screen
  int32_t lw, lh;
  measure(weapons[selected].name, lw, lh);
  pen(12, 12, 12);
  frect(60 - lw / 2 - 3, 104 - 3, lw + 6, 13);
  pen(0, 0, 0);
  text(weapons[selected].name, 60 - (lw / 2), 104);
}